No edit summary Tag: Visual edit |
mNo edit summary |
||
| Line 11: | Line 11: | ||
== '''Story''' == |
== '''Story''' == |
||
| + | {{TBA}} |
||
| − | |||
== '''Topography''' == |
== '''Topography''' == |
||
[[File:Ch 4c.jpg|none|thumb|324x324px]] |
[[File:Ch 4c.jpg|none|thumb|324x324px]] |
||
| + | *There are three main deployment areas |
||
| − | |||
| + | #The easternmost position with the [[Hafen]] and Riley predeployed there; there are also 2 regular unit slots and an extra tank slot. |
||
| + | #The westernmost position; it has space for two infantry units, but is directly exposed to enemy fire on the first turn. |
||
| + | #The northernmost position, anchored by a camp, having 3 unit spaces, and protected from behind by wooden walls; it can easily access the exposed western position. |
||
| + | *There are two main paths that lead toward Raz and Kai's position: an uphill, wide-open area accessible by heading east from the [[Hafen]]'s starting position, and a lower, much narrower path accessible via the northern camp. |
||
| + | **Although Squad E troops can get quite close to Raz and Kai via the uphill path, the end is actually blocked off by indestructible/impassible tank traps. |
||
| + | **The lower path, although allowing for access to Raz and Kai, is filled with imperial fire -- shocktroopers and scouts on the lower path, with grenadiers, snipers, bunkers, and gating turrets on the upper path raining interception fire from above. |
||
== '''Let's think about this, okay?''' == |
== '''Let's think about this, okay?''' == |
||
"Kai and Raz are somewhere northeast of us. They need help, and they need it soon. If the enemy gets to them before we do, there'll be nothing we can do. And lest we forget, there's an unidentified tank coming with its sights on the Hafen... But I do have a plan. I need you to lure that tank into my range. I'll take it from there." |
"Kai and Raz are somewhere northeast of us. They need help, and they need it soon. If the enemy gets to them before we do, there'll be nothing we can do. And lest we forget, there's an unidentified tank coming with its sights on the Hafen... But I do have a plan. I need you to lure that tank into my range. I'll take it from there." |
||
| Line 25: | Line 31: | ||
== '''Strategy''' == |
== '''Strategy''' == |
||
| + | * |
||
| − | |||
| + | *If one wants to destroy |
||
== '''Rewards''' == |
== '''Rewards''' == |
||
{{VC4 mission reward|EXP-Base = 5600|DCT-Base = 10530|Ace Drop = {{insig|sniper}} [[Hawkeye Iris]] - ZM SG 1(e)|Turn-A = 1-4|EXP-A = 11200|DCT-A = 21060|Turn-B = 5|EXP-B = 8400|DCT-B = 15795|Turn-C = 6|EXP-C = 5600|DCT-C = 10530|Turn-D = 7+|EXP-D = 0|DCT-D = 0|EXP-Leader = 448|EXP-Ace = 224|EXP-Tank = 560|EXP-Special = 224|EXP-Stationary Gun = 1008|NUM-Leader = 4|DCT-Leader = 842|NUM-Ace = 1|DCT-Ace = 421|NUM-Tank = 2|DCT-Tank = 1053|NUM-Special = 1|DCT-Special = 421|NUM-Stationary Gun = 9|DCT-Stationary Gun = 1895|EXP-Unit = 2464|NUM-Unit = 17|DCT-Unit = 4632|Other Reward = If A rank obtained, receive "Small Knife" accessory (+3 vsPerson) |
{{VC4 mission reward|EXP-Base = 5600|DCT-Base = 10530|Ace Drop = {{insig|sniper}} [[Hawkeye Iris]] - ZM SG 1(e)|Turn-A = 1-4|EXP-A = 11200|DCT-A = 21060|Turn-B = 5|EXP-B = 8400|DCT-B = 15795|Turn-C = 6|EXP-C = 5600|DCT-C = 10530|Turn-D = 7+|EXP-D = 0|DCT-D = 0|EXP-Leader = 448|EXP-Ace = 224|EXP-Tank = 560|EXP-Special = 224|EXP-Stationary Gun = 1008|NUM-Leader = 4|DCT-Leader = 842|NUM-Ace = 1|DCT-Ace = 421|NUM-Tank = 2|DCT-Tank = 1053|NUM-Special = 1|DCT-Special = 421|NUM-Stationary Gun = 9|DCT-Stationary Gun = 1895|EXP-Unit = 2464|NUM-Unit = 17|DCT-Unit = 4632|Other Reward = If A rank obtained, receive "Small Knife" accessory (+3 vsPerson) |
||
| Line 32: | Line 39: | ||
== '''Aftermath''' == |
== '''Aftermath''' == |
||
| + | {{TBA}} |
||
| − | |||
== '''Notes/Trivia''' == |
== '''Notes/Trivia''' == |
||
* Because Raz actually starts just outside the target area, it's possible to have an explosive blow him backwards into it and therefore complete the objective (as long as it doesn't KO him). |
* Because Raz actually starts just outside the target area, it's possible to have an explosive blow him backwards into it and therefore complete the objective (as long as it doesn't KO him). |
||
| + | == '''Navigation'''== |
||
| ⚫ | |||
| + | {{VC4 Mission List}} |
||
| ⚫ | |||
[[Category:Valkyria Chronicles 4 Missions]] |
[[Category:Valkyria Chronicles 4 Missions]] |
||
Revision as of 22:12, 27 June 2020
| Breaking the Line 3 | |
|---|---|
| Next | |
| |
| Number | Chapter 4(2), part 5 |
| Terrain | Dirt, Grass |
| Time of day | Day |
| Number of units | 12: Claude (Hafen), 1 vehicle slot, Riley, 7 open slots, 1 reserve
Raz (cannot be controlled) |
| CP | Start 10, 7 per turn |
| SP | 1 |
| Turn limit | 20 |
| Turns for A rank | 4 |
| Objectives | Any allied unit reaches the target |
| Failure conditions | The enemy occupies your base camp
All allied infantry fall in action |
| Special conditions | Enemy moves first |
| Enemy vehicles |
|
| Enemy officers |
|
| Enemy ace(s) | |
| Ace drop(s) | ZM SG 1(e) |
The Battle of Siegval, Part 3 is the third and last part of Chapter 4 in Valkyria Chronicles 4. The third combat mission is Breaking the Line 3.
Story
Topography

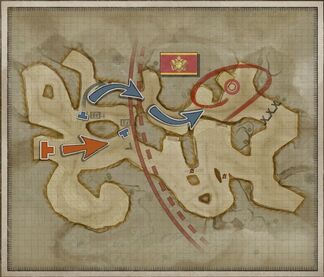
- There are three main deployment areas
- The easternmost position with the Hafen and Riley predeployed there; there are also 2 regular unit slots and an extra tank slot.
- The westernmost position; it has space for two infantry units, but is directly exposed to enemy fire on the first turn.
- The northernmost position, anchored by a camp, having 3 unit spaces, and protected from behind by wooden walls; it can easily access the exposed western position.
- There are two main paths that lead toward Raz and Kai's position: an uphill, wide-open area accessible by heading east from the Hafen's starting position, and a lower, much narrower path accessible via the northern camp.
- Although Squad E troops can get quite close to Raz and Kai via the uphill path, the end is actually blocked off by indestructible/impassible tank traps.
- The lower path, although allowing for access to Raz and Kai, is filled with imperial fire -- shocktroopers and scouts on the lower path, with grenadiers, snipers, bunkers, and gating turrets on the upper path raining interception fire from above.
Let's think about this, okay?
"Kai and Raz are somewhere northeast of us. They need help, and they need it soon. If the enemy gets to them before we do, there'll be nothing we can do. And lest we forget, there's an unidentified tank coming with its sights on the Hafen... But I do have a plan. I need you to lure that tank into my range. I'll take it from there."
Location: Siegval Line, Cliffside Summit
Description: Rescue Raz and Kai by reaching the target before the enemy does. The black tank fires its machine gun while in motion, so try not to leave any allies on its path.
"Come on, Claude. Our friends are waiting for us!"
Strategy
- If one wants to destroy
Rewards
| Base Reward | ||||
| ||||
| Enemy Ace Reward | ||||
|
|
| Ranking Bonus | ||||||||||||||||||||
|
| Unit Rewards | ||||||||||||||||||||||||||||
|
| Other Rewards | |
|
Aftermath
Notes/Trivia
- Because Raz actually starts just outside the target area, it's possible to have an explosive blow him backwards into it and therefore complete the objective (as long as it doesn't KO him).